Source: © YouTube: 璃奈ちゃんボードの作り方【ラブライブ!虹ヶ咲学園スクールアイドル同好会】
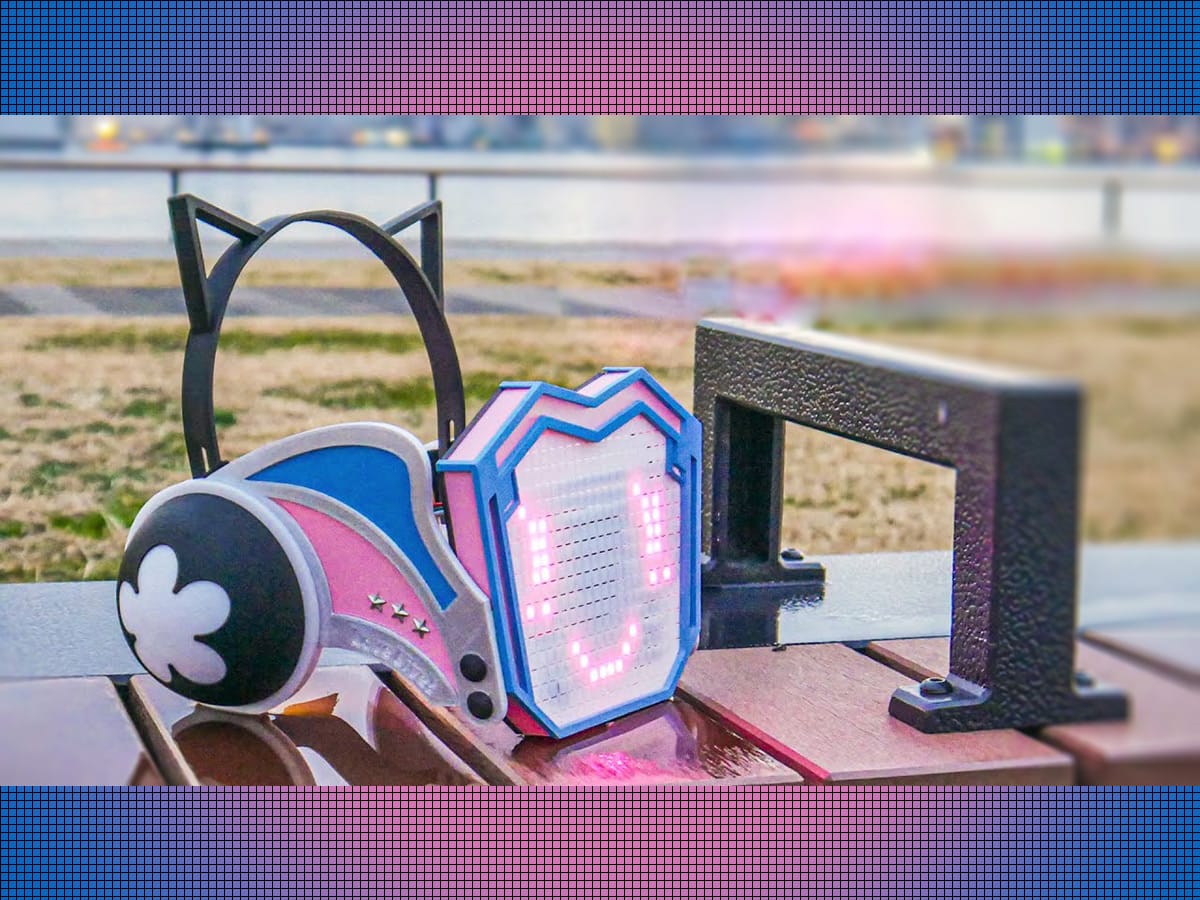
Japanese Love Liver and Engineer Creates Astonishingly Accurate Rina-chan Board
- Tags:
- Anime / Cosplay / DIY / Love Live! / LoveLive! Nijigasaki High School Idol Club / Otaku / Rina Tennoji / Rina-chan Board
Related Article
-

How to Make Hina’s Egg Fried Rice with Pea Shoots in “Weathering with You”
-

Photographer captures gorgeous everyday scenes in Japan with Studio Ghibli aura
-

Japanese Wife Trolls Husband With Snarky Anime Art Whenever She Finds His Porn Stash
-

Japanese Twitter User Makes Absolutely Amazing Anime Artwork Using…Excel
-

Tokyo’s Odd Taxi Cafe to serve up enigmatic treats like Odokawa soda and Mystery Kiss chicken
-

Japanese photographer turns their closet into charming work-from-home space


Hama-san (@ybybybmh) is an avid Love Liver with engineering skills, who's looking forward to the anime adaptation of Nijigasaki High School Idol Club which was announced at the end of last year.
In particular, he seems to be a fan of Rina Tennoji, a shy girl who is not good at expressiveness but skilled at drawing and DIY tech projects. Normally, Rina hides her face with sketchbook which she draws her emotions on. On stage, however, when she needs to use both hands to perform, she wears the "Auto Emotion Convert Rina-chan Board."
"I made a Rina-chan board and showed how I did it on YouTube. Please take a look!!! There's a surprise(?) too."
Since there is no official Auto Emotion Convert Rina-chan Board available for purchase at the current time, Hama-san took it upon himself to make one of his own. In a YouTube video (see below) which has over 52,000 views at the time of writing, he makes his objective clear:
I want to become Rina Tennoji!!!
No small feat. Let's see how he proposes to do this...
Making a working Rina-chan Board
The video traces the progress of the project, humorously skipping or fast-forwarding through technical details so as not to diminish its entertainment value.
First he presents an overview of the steps involved:
Design
What features should it have and how can they be made with the knowledge and technical skills that you have. This will serve as a road map so it’s the most important step.
Software development
Creating the expression control program and the program which automatically displays the expression settings. All the behavior of the device hinges on this so it’s the most important step.
Hardware development
Creating the circuitry for the control switches, the display and the power. In the worst case, if you mess up here, the device could breakdown, so it’s the most important step.
Exterior development
Making the exterior. No matter how elaborate your program or your circuitry is, it’s no exaggeration to say that the appearance determines the quality of the whole thing. This is the most important step.
Looks like all steps are important...
After that informative slide, Hama-san shows how he actually made the device.
He begins with the microcomputer board which will run the programs controlling the device. Hama-san used an Arduino Nano clone. If you're interested in the exact brand he used, you can see it on the box package visible in the background.
He wrote the program (skipping the details in the video)...
Source: 璃奈ちゃんボードの作り方【ラブライブ!虹ヶ咲学園スクールアイドル同好会】 Permission: Hama-san (@ybybybmh) | © YouTube
Then, he designed the circuit...
Source: 璃奈ちゃんボードの作り方【ラブライブ!虹ヶ咲学園スクールアイドル同好会】 Permission: Hama-san (@ybybybmh) | © YouTube
...and tested the circuit on a breadboard.
Source: 璃奈ちゃんボードの作り方【ラブライブ!虹ヶ咲学園スクールアイドル同好会】 Permission: Hama-san (@ybybybmh) | © YouTube
Confident the circuit worked, he attached the circuit onto a circuit board to make it compact.
Source: 璃奈ちゃんボードの作り方【ラブライブ!虹ヶ咲学園スクールアイドル同好会】 Permission: Hama-san (@ybybybmh) | © YouTube
Now, to build the parts!
Using some 3D modeling software, he carefully designed each part so that they would fit together seamlessly and, for the externally facing parts, easy to paint...
Source: 璃奈ちゃんボードの作り方【ラブライブ!虹ヶ咲学園スクールアイドル同好会】 Permission: Hama-san (@ybybybmh) | © YouTube
Then, he ordered the Anycubic Mega S 3D printer.
Apparently it was his first one, and he had no prior knowledge of 3D printing, but he was able to figure it out quite easily.
The first part he made was the screen (face) where Rina-chan's expressions are displayed...
Source: 璃奈ちゃんボードの作り方【ラブライブ!虹ヶ咲学園スクールアイドル同好会】 Permission: Hama-san (@ybybybmh) | © YouTube
Using holes and just the right thinness in the material, he was able to create a screen which gives the impression of a solid surface from the outside yet allows the wearer a certain degree of vision.
Source: 璃奈ちゃんボードの作り方【ラブライブ!虹ヶ咲学園スクールアイドル同好会】 Permission: Hama-san (@ybybybmh) | © YouTube
Once the screen was made, it was time to add the lights. He accomplished this with strips of LED tape.
He needed a total of 2 meters of NeoPixel 2020 ultra-slim tape LED, which has 120 LEDs per meter and cost him 4,200 JPY (incl. tax) per meter for a total of 8,400 JPY.
Source: 璃奈ちゃんボードの作り方【ラブライブ!虹ヶ咲学園スクールアイドル同好会】 Permission: Hama-san (@ybybybmh) | © YouTube
The lights display!
Source: 璃奈ちゃんボードの作り方【ラブライブ!虹ヶ咲学園スクールアイドル同好会】 Permission: Hama-san (@ybybybmh) | © YouTube
And then, it was time to print the other parts of the Rina-chan board such as the decorative side panels, the ear covers, and the headband. According to Hama-san, some parts took half a day and it took about two weeks to make all the parts.
Source: 璃奈ちゃんボードの作り方【ラブライブ!虹ヶ咲学園スクールアイドル同好会】 Permission: Hama-san (@ybybybmh) | © YouTube
After painting the color (a step which he skipped in the video), all he needed to do was put the pieces together and secure them in place with screws.
Source: 璃奈ちゃんボードの作り方【ラブライブ!虹ヶ咲学園スクールアイドル同好会】 Permission: Hama-san (@ybybybmh) | © YouTube
He modified a mobile battery to use as a power source and attached it to the circuit board
Source: 璃奈ちゃんボードの作り方【ラブライブ!虹ヶ咲学園スクールアイドル同好会】 Permission: Hama-san (@ybybybmh) | © YouTube
Almost complete...
Source: 璃奈ちゃんボードの作り方【ラブライブ!虹ヶ咲学園スクールアイドル同好会】 Permission: Hama-san (@ybybybmh) | © YouTube
Et voila!
So, was Hama-san able to become Rina-chan with his creation?
He decided it needed a field test, and what better location than Big Sight in Odaiba, the model for the high school in Nijigasaki High School Idol Club...
Source: 璃奈ちゃんボードの作り方【ラブライブ!虹ヶ咲学園スクールアイドル同好会】 Permission: Hama-san (@ybybybmh) | © YouTube
Source: 璃奈ちゃんボードの作り方【ラブライブ!虹ヶ咲学園スクールアイドル同好会】 Permission: Hama-san (@ybybybmh) | © YouTube
In the narration, Hama-san says: "I thought a grown man such as myself could look cute wearing a Rina-chan board but it turns out I just looked like a grown man wearing a Rina-chan board and acting silly..."
Self-deprecating humor aside, it's clear that he was successful in creating a functioning Rina-chan board which looks quite faithful to the original.
Hama-san calls his creation the Rina-chan Board Mark 1, perhaps implying that further improvements will be made. Speaking of improvements, there is the small inconvenience of having to reach behind the screen and flick switches to change the expression.
Fortunately, as he reveals at the end of the video, Hama-san plans to develop a telepathy stick with a remote control function which should solve that problem.
Video
You can see it all for yourself here:
If you like his video, please subscribe to his channel where you'll see him playing bass guitar, reporting on various Love Live! related activities, and, of course, giving us updates on the Rina-chan board project.
One more thing. As he says in his narration, Hama-san wants to know if you're interested in the technical details of his Rina-chan board or have any questions about anything. If so, please leave a comment on his video, or at his Q & A page here.
Hama-san Links