- Tags:
- Art / Japan / Paper Art / Traditional
Related Article
-

Walk amongst the clouds with this VR video of Kyoto’s Edo era ‘Floating Tea House’
-

Haunting Night Time Photography Shows Tokyo’s Beautiful After Hours
-
Give Your Drink A Shot Of Cute With These Hedgehog Cup Clingers
-

Tokyo 2018 Gyoza Festival Offers A Collection Of Japan’s Best Dumplings
-

“No Adults Allowed” Confectionery Store Is Every Kid’s Dream Come True
-

12-Year-Old Girl Chokes Out 24-Year-Old Opponent In Japanese MMA Debut
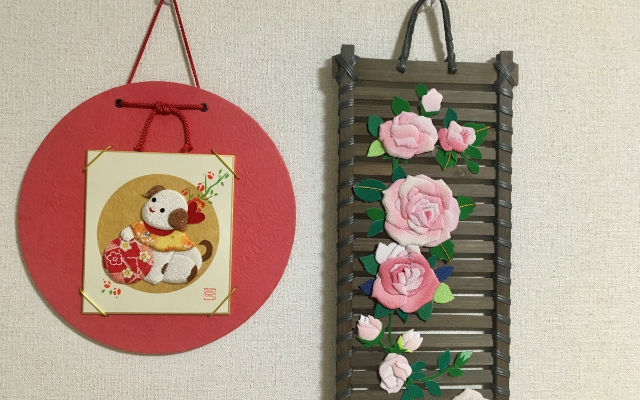


Kurumi E is a unique Japanese craft with wonderful 3D effect designs created by the sponge or cotton fabric put underneath the Japanese paper or cloth, making it thicker. When making Kurumi E, there are several techniques you can try out and in this article, I will try to explain how to easily make it yourself at home.
Copyright cinnamonellie
For this handcraft, you will need a backing board called shikishi board, various fabrics( you can use kimono fabrics or chirimen/crepe cloth), depending on what pattern you chose, cotton or sponge/foam for crafts, scissors, glue, ornaments and accessories, painting kit for faces (eyes, mouth, etc.).
Copyright cinnamonellie
There are several types of Kurumi e and some of the most popular designs are wall hanging Kurumi e with different Japanese motifs, Chinese zodiac, and Warabe Japanese-Girls Kurumi e.
You can buy Craft Packages online on Amazon or eBay and choose any kind of design you want. Usually, a kit consists of shikishi (cardboard), fabrics and accessories such as beads, strings, etc. Most of the kits have very easy to understand diagrams, but you will have to get your tools to start it.
Glue, scissors and marking pens are a must when making Kurumi e, but you might also need tweezers, paint, ruler, wire cutters, pins, toothpicks, etc. if you are a beginner or you want to work more organized.
The first thing you will need to do is read the instructions on the kit and start by gluing the patterns on the back of the cardboards. When I bought my kit, I had included 3 cardboards, but only one had urethane foam on the back of it. Let it dry and then, cut it into pieces.
Afterward, you will need to cut the fabric according to the instructions; usually, each has a letter or a number and the cloth needs to be cut either 0.3mm or 0.5 mm bigger than the cardboard pieces.
You will then need to glue the cardboard pieces to the fabric and afterward, repeat the process with the urethane foam parts, too.
When you have all your parts covered in fabric, you will have to put the pieces together one by one.
Depending on the kit you have, you might be lucky enough to have an actual size paper with instructions where you can assemble the pieces easier before gluing it to the shikishi.
Kurumi e is usually used to decorate the house and gives a nice touch to your home, so I recommend trying to make it yourself.
It is a fun activity and will surely make you proud seeing how it slowly takes shape and turns into something so beautiful at the end.